This one should be the most fun, though perhaps the least inspired, originally. On account of I shot a video of part of it. (Scroll down to see it.)
I started sketching in a cheap sketch-book I had on-hand, while waiting for the paint on ‘darkness looming‘ to dry, and started trying to see what might turn into another new painting. After several pages of messy nothing, I came up with a sketch for a something I liked. Sadly, for you, I didn’t take a picture if it, and I’m not going to, now. Maybe later. Anyway, it seemed interesting enough, and I annotated a few lines and spaces with ideas for colors, and after finishing the inking on ‘darkness looming‘, I started to work on the first layer of ‘1, 2, 3, 4, ‘. This layer was intended to be seen only in the vertical split between the left 2/3 and right 1/3 of the painting, and in the square in the lower right corner, but I wanted to do it right (and add a layer of texture) so I painted the entire canvas.
Purple.


 Then I waited half a day for that to dry. And then, before I started working on the painting again, I set up a video camera to capture the rest of the process. I put a line of 1/2″ tape vertically on the canvas, and cut out a square of tape for the square – it’s like a sort of stencil; where I put the tape, the purple remains when I paint over the rest. Then I painted on the red circle, the blue background, the off-color right-side… You’ll watch the video and see it, right? I don’t need to describe it all in detail? Well, I painted on the colors, and as I’ve learned to do from countless past tape-involved projects before, I pulled up the tape while the paint was still wet. So, to explain the next part of the video: tape isn’t perfect. So some of the paint leaks under. What you can see me doing is cleaning up the worst of it, trying to maintain the purple background as intact as possible without hurting the (still wet) pink and blue foreground. The image you see at right is the painting when this process was complete; the main elements of color are present, but I hadn’t yet put on any borderlines, and certainly hadn’t painted the most-foreground element (the black, horizontal lines), so this image is sort-of an in-between-takes image. It was taken in between where the camera angle changes in the video. The camera angle changed, by the way, because I waited until the next day for it to dry, and I had to put away the camera before Mandy came home, or it would have blocked the walkway.
After the new color layer had dried, it was time to deal with the remaining (slight) leakage (mostly of white) at the edges of where the tape had been. I had taken a day to think about it, and had decided to use pearlescent purple and blue paint pens to both clarify the division by increasing the contrast from one color to another, and to cover up an otherwise unsightly evidence of my process which (in my opinion) did not improve the end result. The video of my tracing the outlines of the previously-taped sections is not particularly interesting, but I decided to just leave it all in. Then, semi-satisfied with the result of the colors, and after the paint from the paint pens had had a chance to dry, it was time for the three rough, black lines that overlap the piece. I put them vaguely on (for scale, placement, and some semblance of erraticism) first in Sharpie, then with a paintbrush and black paint. I knew exactly what I wanted, and it was no problem to execute this final step. There were only minor touch-ups of the black lines after the video camera was turned off, and ‘1, 2, 3, 4, ‘ was ready for hanging.
So that’s how I made this painting. The title was selected while it was still a sketch, and ‘1, 2, 3, 4, ‘ is now available for purchase at wretchedcreature.com

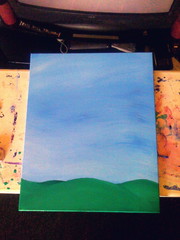
 Okay, this one will be quick. It was the last of the paintings based on blurry photos of doodles I made at work last year. Painted this one Thursday, 5/15/2008. I’d been thinking about it for a while. Thinking pretty seriously all week this week, about how I wanted to go from a blurry simple line drawing to a painting. I considered just doing ink on paper or some other more common media… But I decided that for the background on this one I wanted to have a slight gradation from blackBlackBlack at the top to pure, unpainted white for at least the bottom half of the canvas. I considered painting the white canvas white, even doing some more complex, swirly, flowing, sort of out-of-the-head-and-up and into black abstract thing. But I decided to just take some water, wet half the canvas, take some black paint, black the very top and with water only, work small amounts of the black pigment down the canvas in long, nearly-horizontal strokes. Then, I took the photograph on the right, to show off all the excitement of watching paint dry. Literally.


 Then, while those colors were still drying, I moved forward again. I mixed up a pale blue-green for the skin, more blue in the skin and more green in the beard, but a very subtle gradation between hues was what I was going for. In contrast with the blue-purple coat surrounding it, the green in the beard almost disappears. I actually spent about as much time just on getting the beard to look the way I wanted as I had on the entire hat. I knew I’d been planning on adding a thick outline to the major features of the character before I was done, but I also didn’t want to have to outline the beard – I wanted it to look furry/hairy on its own. So I made sure that I not only was creating variations in color, but that I was creating a fully-overlapping color, beard-over-coat, with hairs and mess along the full edge of the beard, from lip to eyeball. The other colors all had a bit of space between them, and were fairly rough, but for the beard I made sure that the edge I was painting would be an edge I was happy with. More green added to the blue-green for the eyes, then black added to that for the centers, and then for the mouth. For the centers, I also didn’t want to have them outlined, so I made sure the black was touching the green. Then, finally, I decided to let it dry before doing the outlines.
 The next morning, I went out to run some errands, among which was to pick up a gold paint pen. I actually ended up going to six different places to find three items. Only one of which was the gold paint pen that I used to outline the figure’s hat and coat. I’d already had a pearlescent blue pen on hand to use to outline the figure’s eyes and mouth, and that was the easy part. I fought with myself for a long while, trying to get happy with the shape of the hat, the thicknesses of the lines, how much purple was left, how much gold I wanted to use in total… And the pen I’d bought was terrible. Just terrible. It was a real pain just trying to use it without screwing anything up, but after the morning I’d had running all over I wasn’t about to go out and start looking for another one, so I struggled through.